Ensuring Conformance to ASTM A780
Does the AGA provide guidance on ensuring customers that touch up and repairs are in conformance with ASTM A780?

In order to ensure strict adherence to the specification ASTM A780 when performing repairs at the galvanizing plant, the galvanizer should be well versed in the equipment, materials and surface preparation standards required of each repair method. Although some of the requirements within ASTM A780 are relatively straightforward, other requirements related to surface preparation often require clarification.
As a result, the AGA is currently developing a new video series to clarify the many aspects of the touch-up and repair of hot-dip galvanized steel. The six-part video series will provide highly beneficial visual aids to those needing assistance with meeting the requirements of ASTM A780. Topics will include proper equipment and materials to use while performing the process, explanation of the specifications to follow, and examples of best practice during application of the repair materials. Below, see the requirements to be covered in the video series which are often topics of confusion or ambiguity during touch-up and repair at the galvanizing plant.
Maximum Allowable Repair Size
The practice for repairing the galvanized coating in-field is the same as the practice for repair at the galvanizing facility, but there are more restrictions to the allowable repair size while at the galvanizing facility. At the galvanizing facility, the maximum allowable repair size for iron and steel products per ASTM A123 is no more than 1 inch [2.54 cm] in the narrowest dimension, while the total area for repair on an article can be no more than 0.5% of accessible surface area or 36 in2/short ton [22,500 mm2/metric ton], whichever is less. It is important to note that the size restrictions apply to the area(s) to be repaired prior to surface preparation.
There is no ASTM specification which specifies a maximum allowable repair size for galvanized items already accepted and delivered. Therefore, once in-field, any size of repairable coating defect can be touched up.
Surface Preparation
Always check for visible contaminants on the surface of the repair area just prior to mechanical cleaning. Where such contaminants are found, the surface preparation standards associated with all repair materials require the removal of visible dirt, oil and grease deposits using a solvent cleaning method such as SSPC-SP1 Solvent Cleaning. Do ensure the final application of solvent is performed using fresh solvent and a clean rag/brush. It is not acceptable to use the same solvent and rag area or brush from the initial cleaning.
When ready to perform mechanical cleaning, check the surface preparation standard for clarity on the allowable tooling methods. Power tool cleaning per SSPC SP-11 Power Tool Cleaning to Bare Metal requires the use of grinding or impact tools. Appropriate grinding tools include reciprocating sanders, orbital sanders, or grinding devices that utilize abrasive cloths, discs, wheels or flaps. Where blast or power tool cleaning cannot be performed, hand tool cleaning per SSPC-SP2 Hand Tool Cleaning allows the use of wire brushing, scraping, chipping and sanding. Hand tool cleaning with a stiff-bristle or nylon brush does not meet specification.
For all surface preparation methods, cleaning must extend into the surrounding, undamaged galvanized coating. However, do not clean excessively beyond the area of repair. This is especially applicable for abrasive blast cleaned surfaces, where an appropriately sized blasting unit and hose should be utilized.
Inspection of Cleaned Surfaces
After surface preparation, the standards refer to points of inspection necessary to ensure proper adhesion of the repair material. Do not immediately apply repair materials over a freshly cleaned surface. Any dust or loose residue from cleaning must be brushed away using a stiff-bristle brush or blown off using clean, dry air. Ensure a blotter test is performed prior to using a compressed air source in accordance with ASTM D4285.
Next, surface profile measurements are required to ensure at least one mil profile is achieved for power tool or abrasive blast cleaned surfaces. For power tool cleaned surfaces, a surface profile depth micrometer is the appropriate method for confirming profile, unless otherwise agreed. Surface profiling for abrasive blast cleaned surfaces may be performed using any method listed within ASTM D4417 (visual comparator, surface profile depth micrometer, or replica tape). When using profile depth micrometers, zero the gauge out prior to each use and record the highest of ten measurements. Do not average the readings, as this requirement was removed from the specifications in 2014. If replica tape is utilized, two readings are to be taken over each location and averaged to get one "measurement" of the profile of the surface. Correct for the additional tape thickness (i.e. subtract 2 mils) to achieve the correct reading from a spring-loaded micrometer. Additionally, where measurements fall within the Course/XCourse range (1.5- 2.5 mils), one measurement will not be sufficient and two measurements using each tape must be averaged (i.e. a total of 4 readings performed).
Finally, a visual inspection to confirm the level of cleanliness must be carried out to ensure the standard is met. For hand tool cleaning, SSPC VIS III reference cards are recommended to define the acceptance criteria, but the only requirement is an agreement that all loose mill scale, loose rust, loose paint, and other loose detrimental foreign matter have been removed. For power tool cleaning, utilize SSPC VIS III reference cards to confirm the visual definition of achieving bare metal associated with the initial surface condition. For abrasive blast cleaning, utilize SSPC VIS I reference cards to confirm the visual definition of achieving near white metal or white metal (whichever specified) associated with the initial surface condition.
Repair Material Application
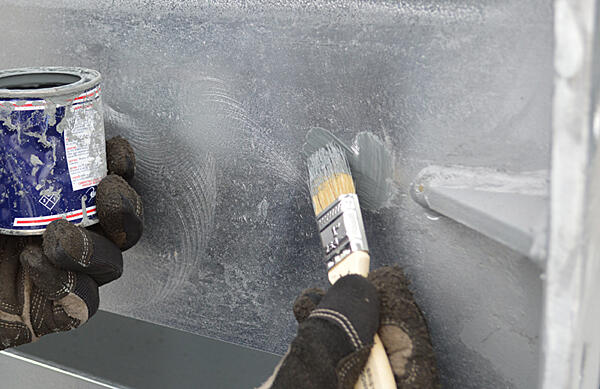
The repair material shall be applied at least two mils thick and according to the environmental requirements for application provided by the manufacturer (i.e. temperature, relative humidity, minimum surface temperature above the dew point, etc.). During repair material application, always be sure to limit the amount of paint applied to the surrounding area, maintaining the area as small as reasonably possible (See Figure 1).

© 2025 American Galvanizers Association. The material provided herein has been developed to provide accurate and authoritative information about after-fabrication hot-dip galvanized steel. This material provides general information only and is not intended as a substitute for competent professional examination and verification as to suitability and applicability. The information provided herein is not intended as a representation or warranty on the part of the AGA. Anyone making use of this information assumes all liability arising from such use.

