Multi-Specimen Test Articles & Coating Thickness Inspection
How are Multi-Specimen Test Articles Inspected for Coating Thickness?
A sampling protocol has been developed by ASTM to ensure high quality products because the inspection of the coating thickness for every piece of material galvanized in a project would not be practical. To properly evaluate hot-dip galvanized coatings, randomly chosen specimens are selected to represent the lot. The inspection quantities are determined by the lot sizes and are detailed in the ASTM specifications A123, A153 and A767.
Update in 2022: The purpose of this article is to clarify the specification language related to coating thickness inspection for single specimen vs. multi-specimen test articles which have been hot-dip galvanized to ASTM A123. Within ASTM A123, the terms specimen and test article are used interchangeably for single-specimen test articles, which can lead to confusion regarding the Coating Thickness Inspection Steps provided in A123 Figure 3 and the inspection requirements for multi-specimen test articles. Further, the current specification language can potentially lead to two different yet common interpretations in the marketplace. ASTM subcommittee A05.13 on Structural Shapes and Hardware Specifications is currently reviewing the specification language and figures related to the sampling/inspection protocol for multi-specimen articles to address this topic. Be on the lookout for a new ASTM A123 specification revision at the end of 2022 or early 2023. For questions or to get involved, contact the AGA Technical Department.
Inspection Terminology
There are six terms used within ASTM A123 to describe the sampling process for inspection of coating thickness. The definitions for these terms are phrased and elaborated below to clarify the requirements for single-specimen vs. multi-specimen test articles:
- Lot the unit of production or shipment from which a sample is taken for testing. For more information, see Galvanizing Note: Determining Inspection Lot Size.
- Sample a group of individual articles from the lot which are tested to determine conformance to the specification requirements. Refer to ASTM A123 Section 7.3 to determine how many test articles constitute a sample based on the initial lot size:
- Test Article an individual article from the sample which is to be examined for conformance to the specification requirements.
- Specimen the surface of an individual test article, or portion of a test article, where thickness measurements are to be performed.
- Single-Specimen Test Articles articles of surface area equal to or less than 160 in2 [1032 cm2] that are of only one material category and steel thickness range as delineated in ASTM A123 Table 1.
- Multi-Specimen Test Articles articles of surface area greater than 160 in2 [1032 cm2] or containing more than one material category or steel thickness range as delineated in ASTM A123 Table 1.
Number of Pieces in Lot | Number of Test Articles |
3 or less | all |
4 to 500 | 3 |
501 to 1,200 | 5 |
1,201 to 3,200 | 8 |
3,201 to 10,000 | 13 |
10,001 and over | 20 |
Is It A Multi-Specimen Test Article?
In order to test coating thickness of multi-specimen test articles, the test articles are subdivided into three continuous local sections with equivalent surface areas, each of which constitutes a unique specimen.
A test article is considered to be a multi-specimen test article if any of the following definitions apply:
- The test article contains multiple material categories as delineated in ASTM A123 Table 1
- The test article contains multiple thickness ranges as delineated in ASTM A123 Table 1
- The surface area of any material category or thickness range within the test article is greater than 160 in2 [1032 cm2]
To determine the surface area of the test article or any part of the test article, it is possible to request the dimensions or surface area directly from the designer, locate the surface area value from the fabrication /design drawings, or approximate the surface area of each section by hand measurement and geometrical calculation (simple designs only).
If articles of different material category and thickness ranges require the same coating grade, such as Grade 75 for a test article containing both ½ in wall thickness (WT) pipe and ¾ in WT pipe, this does not mean these pipes can be inspected together. The two pipes within the test article are in different thickness categories as delineated in ASTM A123 Table 1, and must therefore be separated into two specimens for inspection.
Once the material categories and/or thickness ranges are separated, they must then be evaluated for surface area to determine if further subdivision of the test article is required. It is incorrect to divide large articles by area first (into three equivalent sections), and then by material grade and/or thickness range.
Acceptance Criteria For Inspection: Specimens vs. Test Articles
The various acceptance criteria for coating thickness inspection are provided in various locations within ASTM A123: Section 3, Section 6.1, and Figures 1-3.
These definitions are simplified and elaborated below to clarify the requirements for single-specimen vs. multi-specimen test articles:
- Individual Measurement Readings: an individual measurement reading (spot measurement) has no minimum, but bare areas are not allowed on the part.
- Specimens: the average of the five coating thickness measurement readings for each specimen must have a minimum average coating thickness of not less than one grade below the minimum required per ASTM A123 Table 1, which is based on the order of thickness grade values listed in ASTM A123 Table 2.
- Single-Specimen Test Articles: the average coating thickness of all test articles in the sample must meet the minimum average coating thickness required per ASTM A123 Table 1.
- Multi-Specimen Test Articles: for any material category and/or thickness range (as defined by ASTM A123 Table 1) of surface area ? 160 in² [1032 cm²], every specimen in the sample made from that material category and/or thickness range must be averaged, meeting the minimum average coating thickness required per ASTM A123 Table 1. For any material category and/or thickness range of surface area > 160 in² [1032 cm²], the three specimen measurements for each material category and/or thickness range within each test article must be averaged, meeting the minimum average coating thickness required per ASTM A123 Table 1.
The final inspection of a part shall include coating thickness measurements and a visual inspection. All parts that do not meet the above requirements or pass visual inspection must be resorted and reinspected, or rejected and regalvanized.
Examples of Single Specimen Vs. Multi-Specimen Test Article Inspection
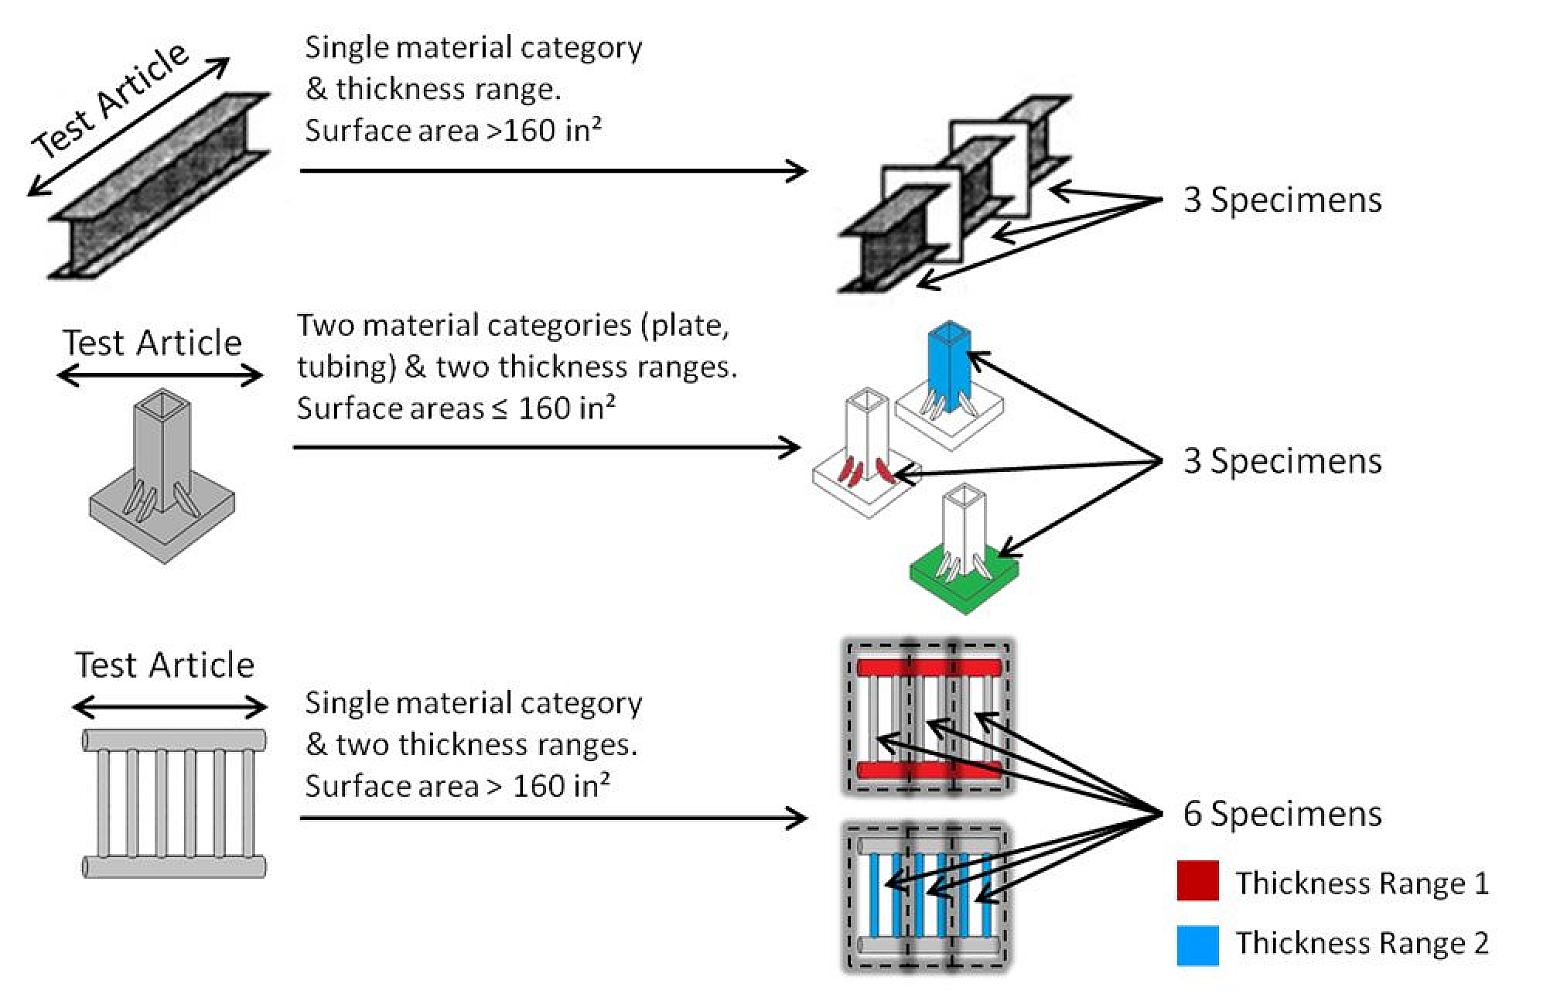
The below four examples demonstrate the inspection of single specimen test articles versus the different types of multi-specimen test articles.
Example 1: Inspection of Single-Specimen Articles
For the inspection of single-specimen articles, randomly select the minimum number of articles from the lot according to ASTM A123 Section 7.3 to become single-specimen test articles. Next, obtain and take the average of five or more widely dispersed measurement readings over the surface area of the specimen in order to represent the total coating thickness of each specimen.
Each specimen must have a minimum average coating thickness of one grade below the minimum required per ASTM A123 Table 1, which is based on the order of thickness grade values listed in ASTM A123 Table 2. As depicted in Figure 1, each test article is only comprised of one specimen, meaning the average coating thickness value recorded for the specimen is also the average coating thickness of the test article.
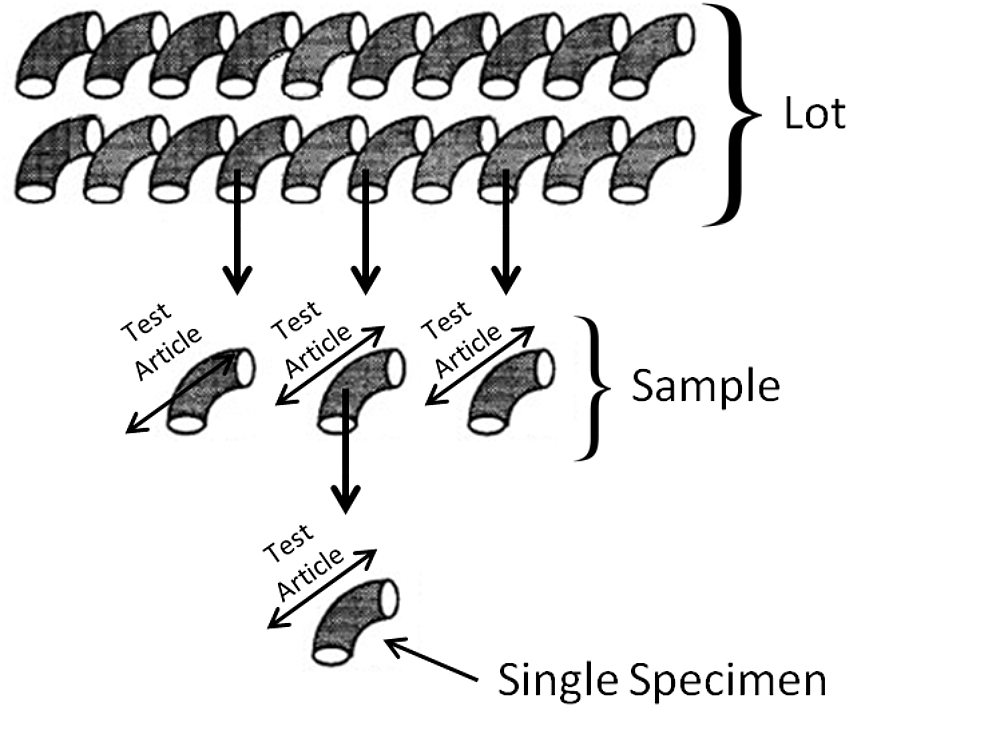
Finally, average the coating thicknesses of all of the test articles in the sample. The average coating thickness of all the test articles in the sample must meet the minimum average coating thickness required per ASTM A123 Table 1.
Example 2: Inspection of Multi-Specimen Articles of Single Material Category and Thickness Range, Surface Area >160 in2
In order to test coating thickness of products whose surface area is > 160 in² [1032 cm2] but only comprised of one material category and thickness range, randomly select the minimum number of articles from the lot according to ASTM A123 Section 7.3 to become multi-specimen test articles. Then, as depicted in Figure 2, divide each test article into three continuous sections of equal surface area, so that each third is a unique specimen requiring inspection.
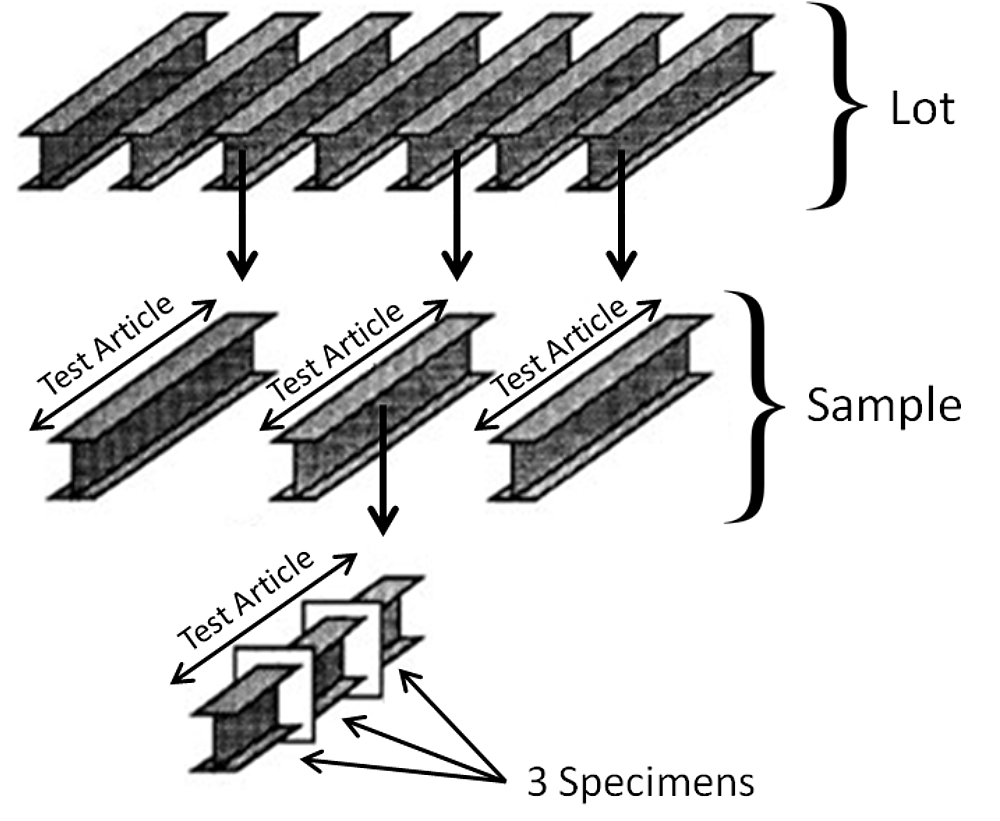
Next, average five or more widely dispersed measurement readings over the surface area of each specimen (each third of the test article) to represent the coating thickness. Each specimen must have a minimum average coating thickness of one grade below the minimum required per A123 Table 1, which is based on the order of thickness grade values listed in ASTM A123 Table 2.
Finally, average the three coating thickness values for each specimen to obtain the average coating thickness for each multi-specimen test article. Each multi-specimen test article must meet the minimum average coating thickness required per A123 Table 1.
Example 3: Inspection of Multi-Specimen Articles Containing Multiple Material Categories or Thickness Ranges, Surface Areas ? 160 in2
In order to test coating thickness of products comprised of multiple material categories or thickness ranges, but with the surface area of those categories/thickness ranges <160 in² [1032 cm2], randomly select the minimum number of articles from the lot according to ASTM A123 Section 7.3 to become multi-specimen test articles. Then, divide each test article by material category and thickness range in order to determine the number of specimens in the test article.
In the example presented in Figure 3, there are a total of three specimens for each multi-specimen test article: two material categories (plate and tubing), and two thickness ranges of plate. Because each specimen has a total surface area <160 in² (1032 cm²), there is no need for further sub-division of these specimens.
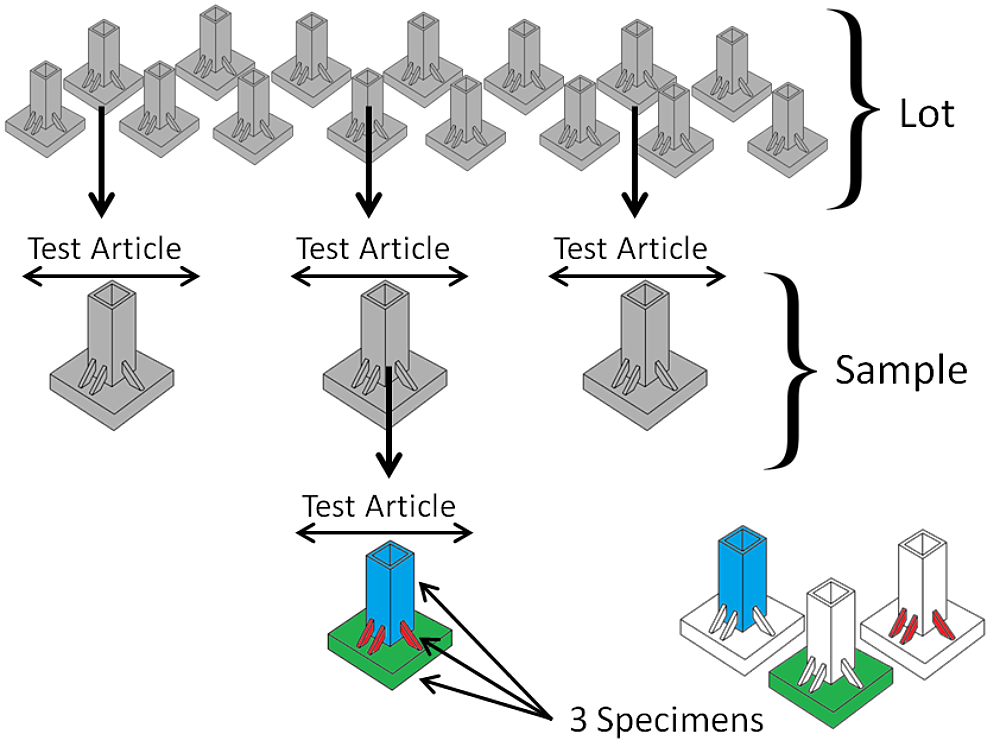
Next, obtain and take the average of five or more widely dispersed measurement readings over the surface area of each specimen to represent the coating thickness. Each specimen must have an average coating thickness of one grade below the minimum required per A123 Table 1, which is based on the order of thickness grade values listed in ASTM A123 Table 2.
Finally, because every material category and/or thickness range within the article is of surface area <160 in² [1032 cm²], every specimen in the sample made from that material category and/or thickness range must be averaged, meeting the minimum average coating thickness required per ASTM A123 Table 1.
Example 4: Inspection of Multi-Specimen Articles Containing Multiple Material Categories or Thickness Ranges, Surface Areas > 160 in2
In order to test coating thickness of products comprised of multiple material categories or thickness ranges of a surface area > 160 in² [1032 cm2], randomly select the minimum number of articles from the lot according to ASTM A123 Section 7.3 to become multi-specimen test articles. To determine the number of specimens in each test article, divide each test article by material category and thickness range first, then further subdivide into three equal sub-specimens if the surface area for that material type and/or thickness range (for the entire test article) is above 160 in² [1032 cm2].
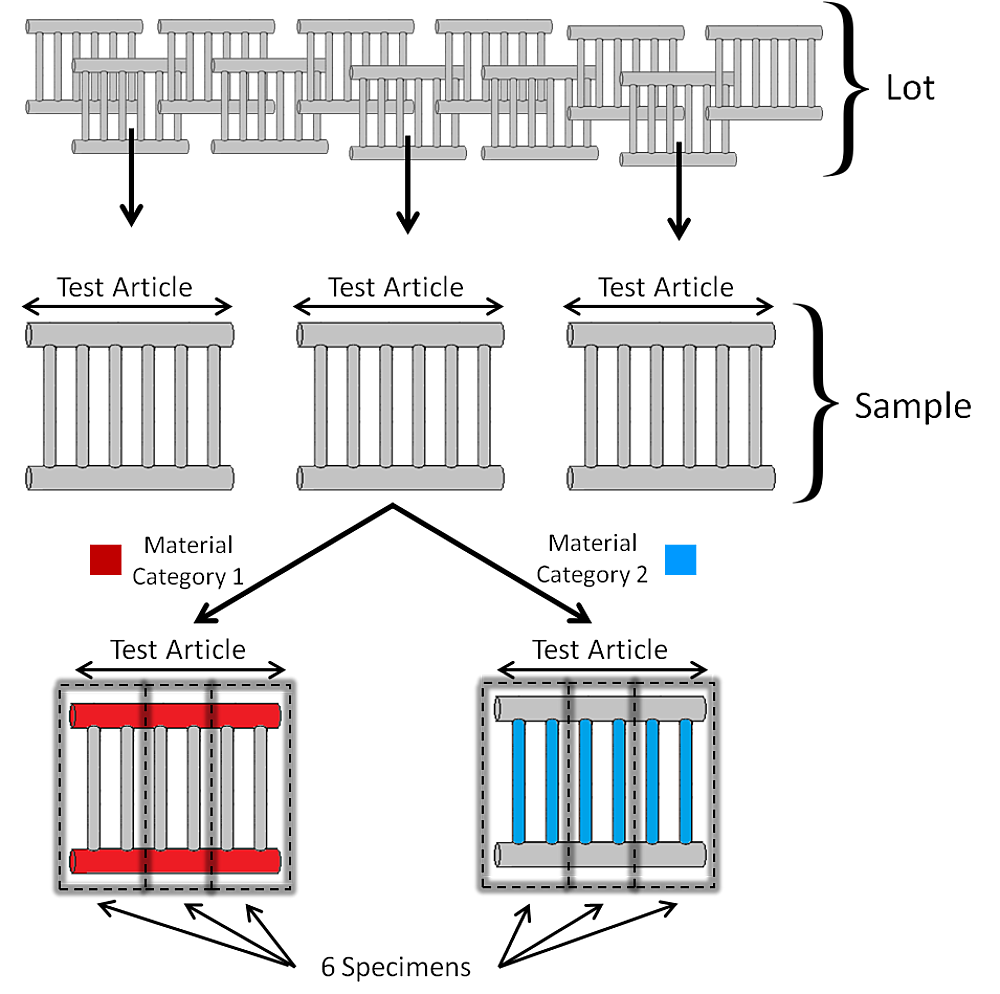
In the example presented in Figure 4, the test article is comprised of one material category (pipe) but two different thickness ranges. Additionally, the surface area for each pipe thickness range is greater than 160 in² [1032 cm2] within the test article. As a result, further subdivision of each material thickness range is required (division into thirds), and therefore a total of six specimens are required for each multi-specimen test article.
Next, average five or more widely dispersed measurement readings over the surface area of each specimen (each third of the separated material categories/thickness ranges within the test article) to represent the coating thickness of each specimen. Each specimen must have a minimum average coating thickness of one grade below the minimum required per ASTM A123 Table 1, which is based on the order of thickness grade values listed in ASTM A123 Table 2.
Average the three coating thickness values for each specimen which comprises a material category/thickness range to obtain the average coating thickness for each separated section of the test article. The average coating thickness for each material category/thickness range in every multi-specimen test article within the sample must meet the associated minimum average coating thickness required per ASTM A123 Table 1.
Best Practices for Inspection of Multi-Specimen Test Articles
The following list of best practices will increase accuracy and minimize confusion when performing coating thickness inspection for multi-specimen test articles:
1. Additional Measurement Readings to Represent the Specimen
When collecting coating thickness measurement readings on a specimen in order to determine the average coating thickness, the specification requires that the average thickness be determined from no less than five test measurements [spot measurements] on a specimen, when each measurement location is selected to provide the widest dispersion (in all applicable directions) of locations for the steel category of the test article within the confines of the specimen volume.
The intent of the above specification language is to ensure sufficient measurement readings are taken in order to adequately represent the entire specimen. Five measurements may not always be sufficient to represent specimens of many pieces or sides. To demonstrate where best practice may necessitate additional measurement readings, see the following example in Figure 5 below:
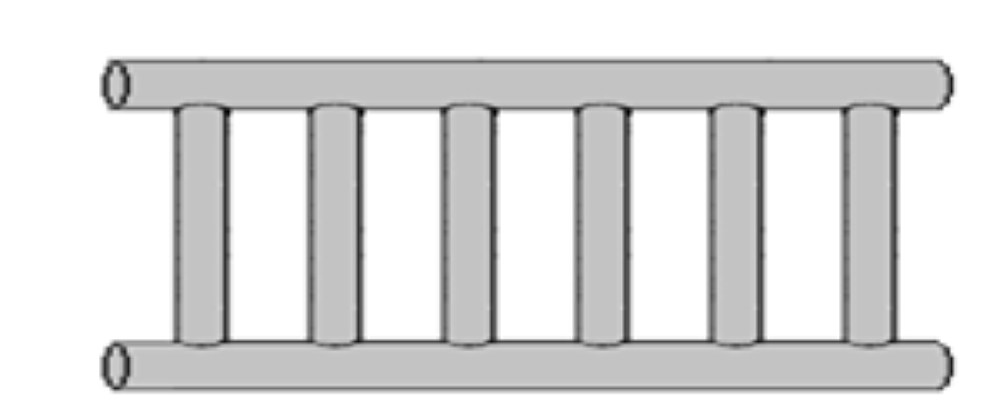
The tubular assembly in Figure 6 is made of material from the same material grade and thickness but is greater than 160 in2 [1032 cm2] in surface area. Therefore, each test article in the sample must be subdivided into three continuous local sections of equivalent surface area (three specimens).

A minimum of five coating thickness readings are required for each specimen, but best practice would be to sample each separate area equally within the specimens to accurately sample the entire article. Figure 7 depicts eight total readings dispersed over the front and back of each specimen.

2. Ensure Best Accuracy When Using Coating Thickness Gauges
Sometimes, inspection issues related to insufficient coating thickness are the result of using an uncalibrated coating thickness gauge, or one where accuracy has not been verified and adjusted. This can be prevented by following the best practices for calibration, verification, and adjustment provided by the gauge manufacturer.
Calibration (or certification) is performed by the gauge manufacturer or qualified laboratory using a documented process according to detailed calibration standards. A re-calibration cycle is not strictly required by inspection standards, but is typically performed on an annual basis or according to the manufacturers recommendations.
Verification of gauge accuracy is performed by the inspector while on the job. According to ASTM D7091 Practice for Nondestructive Measurement of Dry Film Thickness of Nonmagnetic Coatings Applied to Ferrous Metals and Nonmagnetic, Nonconductive Coatings Applied to Non-Ferrous Metals, electronic gauges should be verified and adjusted according to the method recommended by the manufacturer (shims, coated test blocks) prior to, during, and after each period of use. At a minimum, this means gauges should to be calibrated prior to each shift, after a large amount of readings have been taken, or anytime the gauge is dropped or roughly handled. Additionally, the gauge should be verified for accuracy in the intended range. For example, if the gauge will be used to inspect Coating Grade 100, the gauge should be verified above and below 3.9 mils.
For more information, ASTM E376 Practice for Measuring Coating Thickness by Magnetic-Field or Eddy-Current (Electromagnetic) Testing Methods, provides additional tips for obtaining measurements with the greatest accuracy, as well as describing how the physical properties, the structure, and the coating can interfere with the measurement methods. It also contains some general guidelines for how to reduce errors.
3. Utilize a Consistent Unit Measurement System
ASTM A123 provides values in metric and imperial units for inspection requirements. To minimize confusion during inspection, utilize only one measurement system and avoid unit conversions. This practice is applicable when determining material thickness range, surface areas, and coating thickness values.
© 2026 American Galvanizers Association. The material provided herein has been developed to provide accurate and authoritative information about after-fabrication hot-dip galvanized steel. This material provides general information only and is not intended as a substitute for competent professional examination and verification as to suitability and applicability. The information provided herein is not intended as a representation or warranty on the part of the AGA. Anyone making use of this information assumes all liability arising from such use.
