Sampling
A sampling protocol has been developed by ASTM to ensure high quality products because the inspection of the coating thickness for every piece of material galvanized in a project would not be practical. ASTM A123/A123M states for a unit of products whose surface area is equal to or less than 160 in² (1032 cm²), the entire surface of each test product constitutes a specimen. In the case of a product containing more than one material category or steel thickness range, that product will contain more than one specimen. In addition, products with surface areas greater than 160 in² (1032 cm²) are multi-specimen products. There are four important terms used in the ASTM specifications:
Sampling Terms
- Lot - unit of production or shipment from which a sample is taken for testing
- Sample - a collection of individual units of product from a single lot
- Specimen - the surface of an individual test product or a portion of a test product which is a member of a lot or a member of a sample representing that lot
- Test Product - an individual unit of product that is a member of the sample
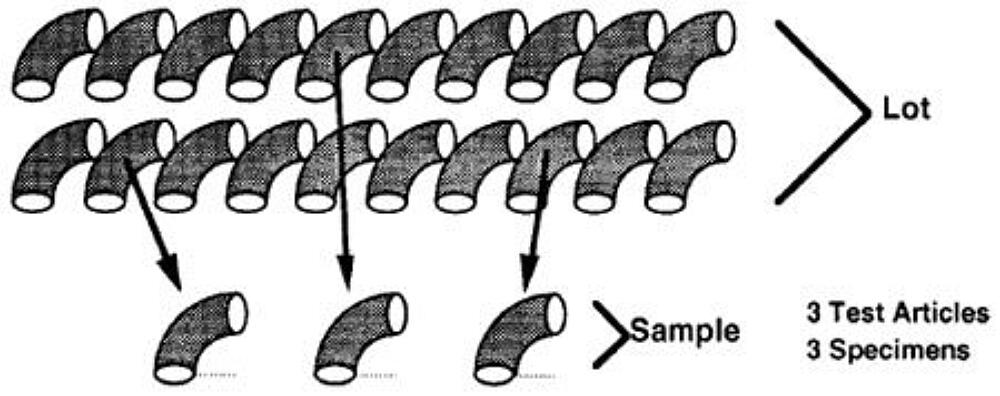
For single specimen products, each randomly selected product is a specimen. In thickness measurement tests, five measurements are taken widely dispersed over the surface area of the specimen in order to represent the total coating thickness. The mean value of the five coating thicknesses for one specimen must have a minimum average coating thickness grade of not less than one grade below the minimum average coating thickness for the material category. Figure 53 shows the separation of a lot into a sample and individual specimen.

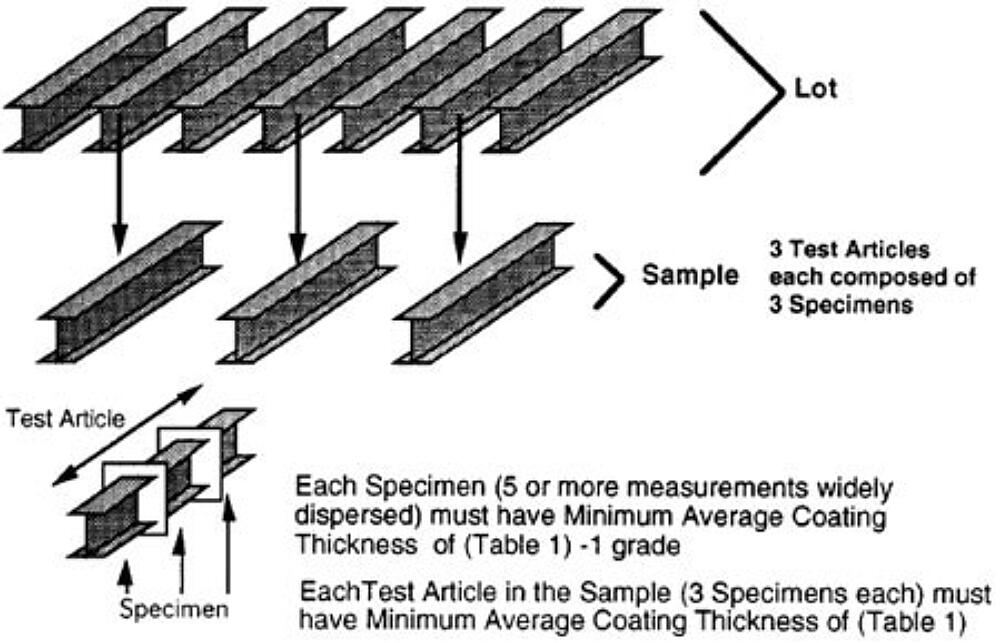
A multi-specimen product is defined as having a surface area that is larger than 160 in² (1032 cm²), have multiple steel thicknesses, or contain more than one coating category. In order to test coating thickness of products whose surface area is greater than 160 in² (1032 cm²), they are subdivided into three continuous local sections with equivalent surface areas, each of which constitutes a unique specimen. In the case of any such local section containing more than one material category or steel thickness range, that section will contain more than one specimen. Figure 54 depicts the separation of a lot into a sample and individual specimen.

For products hot-dip galvanized to either ASTM A123/A123M or A153/A153M, Table 6 is used to determine the minimum number of specimens for sampling from a given lot size.
| No. of Pieces in Lot | No. of Specimens |
|---|---|
| 3 or less | All |
| 4 to 500 | 3 |
| 501 to 1200 | 5 |
| 1201 to 3200 | 8 |
| 3201 to 10,000 | 13 |
| 10,001+ | 20 |
| Table 6: Minimum Number of Specimens | for ASTM A123 and A153 |
For rebar hot-dip galvanized according to ASTM A767, the information below is used to determine the minimum number of samples per lot, measurements per sample, and the total number of measurements required for each of the different coating thickness measurement techniques.
| Magnetic Thickness | Microscopy Method | Stripping and Weighing |
|---|---|---|
3 samples per lot | 5 samples per lot | 3 samples per lot |
5 or more measurements per sample | 4 measurements per sample | |
15 measurements, at the minimum, comprise the average | 20 measurements, at minimum, comprise the average |
The minimum average coating thickness for a lot is the average of the specimen values and must meet the minimum for the material category. The minimum for an individual specimen is one grade below the minimum for the material category. An individual measurement has no minimum, but bare areas are not allowed on the part. The final inspection of a part shall include thickness measurements and visual inspection. All parts that do not meet the requirement must be resorted and reinspected or rejected and then regalvanized.